Greetings All!
My second post of the day! The theme for this weeks challenge, hosted by She Who Does Nails, is jewellery. Now, I don't wear much jewellery. I have quite a few necklaces that I wear from time to time, but that's about it! However, I do have a sort of 'permanent jewellery' - my piercings and tattoos! So I did some nail art based around that! (Personally I think it's a pretty awesome idea, but that may just be me lol)
So I started off with 3 coats of OPI Samoan Sand, which is very 'skin toned'. I then found stamps that were pretty close to some of my tattoos.
OK, there's quite a bit of explaining here! By some good fortune I had stamps to match the tattoos I couldn't easily take a picture of, but as only one is an exact match anyway, I'm only a little bit annoyed.
I stamped my thumb with BM322, to represent an ankh tattoo I have on my hip. It doesn't have the 'flashes' around it, but my selection of ankh stamps is fairly limited (there's a sentence I never thought I'd say).
My index finger I am very proud of - I used BM206 to make a decal that is an exact match to a tattoo I have on the back of my neck! If you are unfamiliar with this technique, I read about it HERE, I was directed by...I can't remember who, I'm sorry. Anyway, it's a method of turning nail stamps into decals, where you can 'colour them in', in my case with OPI The Thrill of Brazil. It's a bit fiddly, and you can see I got a couple of air bubbles trapped in there, but I'm pretty happy with it for my first try!
My middle finger has bats, courtesy of BM213, to represent the bat tattoo on my arm. It was my first tattoo, although I did add more bats to it at a later date. I used Konad Black for all the 'tattoos'
My ring finger represents my three lip piercings, the oldest of which I have had for nearly 13 years! I stamped with BM02 and OPI The Thrill of Brazil, then added silver caviar beads as my 'piercings'.
My little finger has a chain, stamped with BM12 and Barry M Silver Foil. A lot of my necklaces just have simple chains like this (I couldn't find a fifth tattoo stamp lol)
I finished it all off with matte topcoat, to give it that 'skin' look (eewww!).
So, big thanks go to Bundle Monster for their excellent selection of stamps!
Here is a bonus picture of a tattoo I could take a picture of, and it couldn't really be more fitting.
That is on my left wrist. Yeah, I'm pretty weird.
Please be sure to check out everyone else's jewelly nails!
Wednesday, 8 May 2013
Nails Inc Free With Instyle Magazine - You're A Peach
Greetings All!
I just wanted to share this quickly with you. Instyle magazine are giving away one of three shades of Nails Inc polish with this month's (June) issue! There is a pink polish, a red polish, and a peach polish. Of course I chose the peach, although I'm starting to think I should have chosen the pink!

from http://www.instyle.co.uk/beauty/news/don-t-miss-your-free-exclusive-nails-inc-polishes-with-instyle
I don't have much experience with Nails Inc polishes, only the Leather Effect ones, but I have to say, I was disappointed. This brand of polish retails at around £11, so they aren't cheap. For that money, I expect a decent polish! This applied pretty horribly, and was very lumpy and bumpy. No way I could have left it without topcoat. This is 2 coats, with a very generous layer of SV to smooth it out.
I do like the colour, even though it's a very bog standard peach. I also thought the coverage was quite good - 2 coats was all I needed. It was just the finish - fair enough, with topcoat it looks fine, but personally I would like to have the option, if that makes sense. Use topcoat if I want to protect and prolong the polish, but for trying it on? I don't think it should be necessary. Especially considering how much these cost. Fortunately this one only cost me £3.80, the price of the magazine!
What do you think? Should more expensive polishes be held to a higher standard? Or am I just being fussy?
I just wanted to share this quickly with you. Instyle magazine are giving away one of three shades of Nails Inc polish with this month's (June) issue! There is a pink polish, a red polish, and a peach polish. Of course I chose the peach, although I'm starting to think I should have chosen the pink!

from http://www.instyle.co.uk/beauty/news/don-t-miss-your-free-exclusive-nails-inc-polishes-with-instyle
I don't have much experience with Nails Inc polishes, only the Leather Effect ones, but I have to say, I was disappointed. This brand of polish retails at around £11, so they aren't cheap. For that money, I expect a decent polish! This applied pretty horribly, and was very lumpy and bumpy. No way I could have left it without topcoat. This is 2 coats, with a very generous layer of SV to smooth it out.
I do like the colour, even though it's a very bog standard peach. I also thought the coverage was quite good - 2 coats was all I needed. It was just the finish - fair enough, with topcoat it looks fine, but personally I would like to have the option, if that makes sense. Use topcoat if I want to protect and prolong the polish, but for trying it on? I don't think it should be necessary. Especially considering how much these cost. Fortunately this one only cost me £3.80, the price of the magazine!
What do you think? Should more expensive polishes be held to a higher standard? Or am I just being fussy?
Tuesday, 7 May 2013
Invogue Matt Suede Effect Collection
Greetings All!
As regular readers will know, I'm a big fan of a matte finish. I have multiple bottles of Asda matte topcoat, so I can get a matte finish on any manicure , but it's also nice sometimes to have a matte polish, as they dry so quickly, and it saves loads of time!
I spent weeks looking for these polishes, and the Feather Effects ones too (more on them at a later date!) in various Superdrugs in my local area, to no avail (I still haven't seen them in any shops). I then found them online, and for a pound cheaper too! So at least my story has a happy ending!
Housekeeping - I used 2 coats for all these swatches. They applied really nicely, much better than the W7 Suedes (sorry W7!), they dried very quickly, and the formula must be good because all of these swatches are with zero cleanup. I try to make the effort to cleanup (and I need to!) but polishes like these are just terrible - one touch and there is glitter everywhere. I would rather have the couple of dots on my cuticles than a ring of glitter all round my finger lol.
Aren't they just droolworthy?! I love it when I finally get my hands on a polish, and then, even with all the anticipation, it's still better than I thought it would be! Let's take a closer look...
As regular readers will know, I'm a big fan of a matte finish. I have multiple bottles of Asda matte topcoat, so I can get a matte finish on any manicure , but it's also nice sometimes to have a matte polish, as they dry so quickly, and it saves loads of time!
I spent weeks looking for these polishes, and the Feather Effects ones too (more on them at a later date!) in various Superdrugs in my local area, to no avail (I still haven't seen them in any shops). I then found them online, and for a pound cheaper too! So at least my story has a happy ending!
Housekeeping - I used 2 coats for all these swatches. They applied really nicely, much better than the W7 Suedes (sorry W7!), they dried very quickly, and the formula must be good because all of these swatches are with zero cleanup. I try to make the effort to cleanup (and I need to!) but polishes like these are just terrible - one touch and there is glitter everywhere. I would rather have the couple of dots on my cuticles than a ring of glitter all round my finger lol.
![]() |
| I did a collage!!! |
Monday, 6 May 2013
Etude House Ice Cream Nails - Mint Choco Chip
Greetings All!
Welcome to another new week! You may notice a few changes happening around here - I'm trying to make this more of a real blog, instead of a kind of blog skeleton lol. So, we have a new 'about me' page, a British Nail Blogger page, where you can meet and visit all the lovely ladies from the group, and I've got my little, somewhat rubbish Facebook page too (I keep forgetting to post in it lol). I have some more stuff planned, but to be honest I've struggled with what I've done so far! So expect baby steps lol.
Last month I showed you three gorgeous glitters from Etude House (HERE), but I was a little disappointed that only three of the four were in stock. I really wanted to 'complete the set' so after a bit of searching I managed to find a bottle of the fourth polish. Yay! Set complete!
Mint Choco Chip is a pretty little pale, minty green (duh!) with dark, reddy brown hexes and glitter, pink squares, and green and copper hexes. It is indeed reminiscent of mint choc chip ice cream! For this manicure I used 2 coats, and topcoat.
Welcome to another new week! You may notice a few changes happening around here - I'm trying to make this more of a real blog, instead of a kind of blog skeleton lol. So, we have a new 'about me' page, a British Nail Blogger page, where you can meet and visit all the lovely ladies from the group, and I've got my little, somewhat rubbish Facebook page too (I keep forgetting to post in it lol). I have some more stuff planned, but to be honest I've struggled with what I've done so far! So expect baby steps lol.
Last month I showed you three gorgeous glitters from Etude House (HERE), but I was a little disappointed that only three of the four were in stock. I really wanted to 'complete the set' so after a bit of searching I managed to find a bottle of the fourth polish. Yay! Set complete!
Mint Choco Chip is a pretty little pale, minty green (duh!) with dark, reddy brown hexes and glitter, pink squares, and green and copper hexes. It is indeed reminiscent of mint choc chip ice cream! For this manicure I used 2 coats, and topcoat.
As you can see, the polish is sheer enough that you can just see the glitter underneath, but opaque enough to give it that wonderful depth. It also gives the larger hexes a lovely milky finish, which just adds to the ice cream theme. Glitter distribution was pretty good - this was two coats with the bare minimum of dabbing. Another Etude House winner!
I'm very happy with this polish - partly because I now have the whole set of glitters, and partly because it's so cute! It's definitely making me hungry for ice cream though...
Sunday, 5 May 2013
Sun-Tried-Day: Color Club Kaleidoscope Collection
Greetings All!
I told you there was more coming! I got this set at the same time as the Fiesta set, again for £7.99. This is also apparently a Spring 2013 collection, so extra bargainous!
Sun-Tried-Day: Color Club Fiesta Collection
Greetings All!
Once again I have resisted the urge to bring out my Sally Hansens! I've still been swatching them though - I guess I could save them into one massive post? Nah, I won't do that to you lol.
Instead, this week I will be showing you two new(ish) collections from Color Club. I was fairly familiar with this brand even before this years Halo Hues sent us all crazy, from US nail blogs, but it isn't a brand you see very often here in the UK. Last month I was lucky enough to snap up four collections in my local TK Maxx. They each came with six polishes and a top coat, and were only £7.99 per set!
Later on I will show you the Kaleidoscope Collection, but right now I have the Fiesta collection to share with you! I think this is a Spring 2013 collection, so pretty recent, which makes it even more of a bargain!
Once again I have resisted the urge to bring out my Sally Hansens! I've still been swatching them though - I guess I could save them into one massive post? Nah, I won't do that to you lol.
Instead, this week I will be showing you two new(ish) collections from Color Club. I was fairly familiar with this brand even before this years Halo Hues sent us all crazy, from US nail blogs, but it isn't a brand you see very often here in the UK. Last month I was lucky enough to snap up four collections in my local TK Maxx. They each came with six polishes and a top coat, and were only £7.99 per set!
Later on I will show you the Kaleidoscope Collection, but right now I have the Fiesta collection to share with you! I think this is a Spring 2013 collection, so pretty recent, which makes it even more of a bargain!
Saturday, 4 May 2013
She Who Does Nail Art Challenges: More Holiday Nails!
Greetings All!
Good weekend? Bad weekend? I have another set of holiday nails for you! This challenge is hosted by She Who Does Nails, and we can post as many entries for each theme as we like! Which is great for when you think of more than one idea for the theme, like I did.
These nails are, I guess, Hawaiian inspired. They were going to be tropical inspired, but then I noticed the multiple hibiscus flower stamps in my Bundle Monster collection (well, it is a Hawaiian company!), and to me they just shout tropical.
Ok so in real life these were neon! My camera hasn't quite picked up on that! But they were very bright, and Pow! Maybe a little bit bright for my taste, but the black stamping helped. I used Sally Hansen Ivory Skull as a base, then I did a gradient with Ridiculously Yellow, Formidably Orange, and Riotously Pink from the OPI Outrageous Neons mini set. This set is so perfect for me - I'm not a massive fan of neons, they're just too bright for me. However sometimes I will include neon in my nail art, so these tiny bottles are just perfect! I just wish there was a blue and green in there, to 'complete the set' lol.
I then stamped with BM313 and BM318, using Konad Black.
Good weekend? Bad weekend? I have another set of holiday nails for you! This challenge is hosted by She Who Does Nails, and we can post as many entries for each theme as we like! Which is great for when you think of more than one idea for the theme, like I did.
These nails are, I guess, Hawaiian inspired. They were going to be tropical inspired, but then I noticed the multiple hibiscus flower stamps in my Bundle Monster collection (well, it is a Hawaiian company!), and to me they just shout tropical.
Ok so in real life these were neon! My camera hasn't quite picked up on that! But they were very bright, and Pow! Maybe a little bit bright for my taste, but the black stamping helped. I used Sally Hansen Ivory Skull as a base, then I did a gradient with Ridiculously Yellow, Formidably Orange, and Riotously Pink from the OPI Outrageous Neons mini set. This set is so perfect for me - I'm not a massive fan of neons, they're just too bright for me. However sometimes I will include neon in my nail art, so these tiny bottles are just perfect! I just wish there was a blue and green in there, to 'complete the set' lol.
I then stamped with BM313 and BM318, using Konad Black.
Friday, 3 May 2013
Girly Girl Nail Art Challenge - Week 6: Who Inspires You?
Greetings All!
Welcome to my second challenge post of the day! This one is for the Girly Girl challenge, hosted by Ramblings of a Closet Diva. Here's a quick reminder of all the themes.
This week the theme is 'who inspires you?'. Last week while out I saw a bag that I thought would make a nice nail art design, and my mum also mentioned that I should recreate it, hopefully that counts as inspiration!
The bag was houndstooth with purple roses on. Not something I would want as a bag! But I did think it would be fun on my nails, plus I have loads of houndstooth stamps for some reason.
Yeah, so I went a little picture crazy! I was really pleased with how these turned out. They look almost exactly like they did in my head, and that's my ultimate goal really. I must thank that random bag, because I never would have thought of this combination myself! But they are now my favourite rose nails yet!
I used Sally Hansen Ivory Skull, then stamped with CH13 and Konad Black. Once that was dry and topcoated, I drew on the roses using Models Own Grape Juice and Pukka Purple, and I then the leaves with Sally Hansen Grass Slipper and Essie Mojito Madness.
Now go and see who has been inspiring others!
Welcome to my second challenge post of the day! This one is for the Girly Girl challenge, hosted by Ramblings of a Closet Diva. Here's a quick reminder of all the themes.
This week the theme is 'who inspires you?'. Last week while out I saw a bag that I thought would make a nice nail art design, and my mum also mentioned that I should recreate it, hopefully that counts as inspiration!
The bag was houndstooth with purple roses on. Not something I would want as a bag! But I did think it would be fun on my nails, plus I have loads of houndstooth stamps for some reason.
Yeah, so I went a little picture crazy! I was really pleased with how these turned out. They look almost exactly like they did in my head, and that's my ultimate goal really. I must thank that random bag, because I never would have thought of this combination myself! But they are now my favourite rose nails yet!
I used Sally Hansen Ivory Skull, then stamped with CH13 and Konad Black. Once that was dry and topcoated, I drew on the roses using Models Own Grape Juice and Pukka Purple, and I then the leaves with Sally Hansen Grass Slipper and Essie Mojito Madness.
Now go and see who has been inspiring others!
Relaxed 31DC - Week 10: Gradient
Greetings All!
Well done to all of us for getting through another week! Today is Double Challenge Friday, later on I'll be showing you my Girly Girl nails, but right now is the extra relaxed 31 day/week challenge, hosted by Rambles of a Polish Addict. We are a third of the way through already!
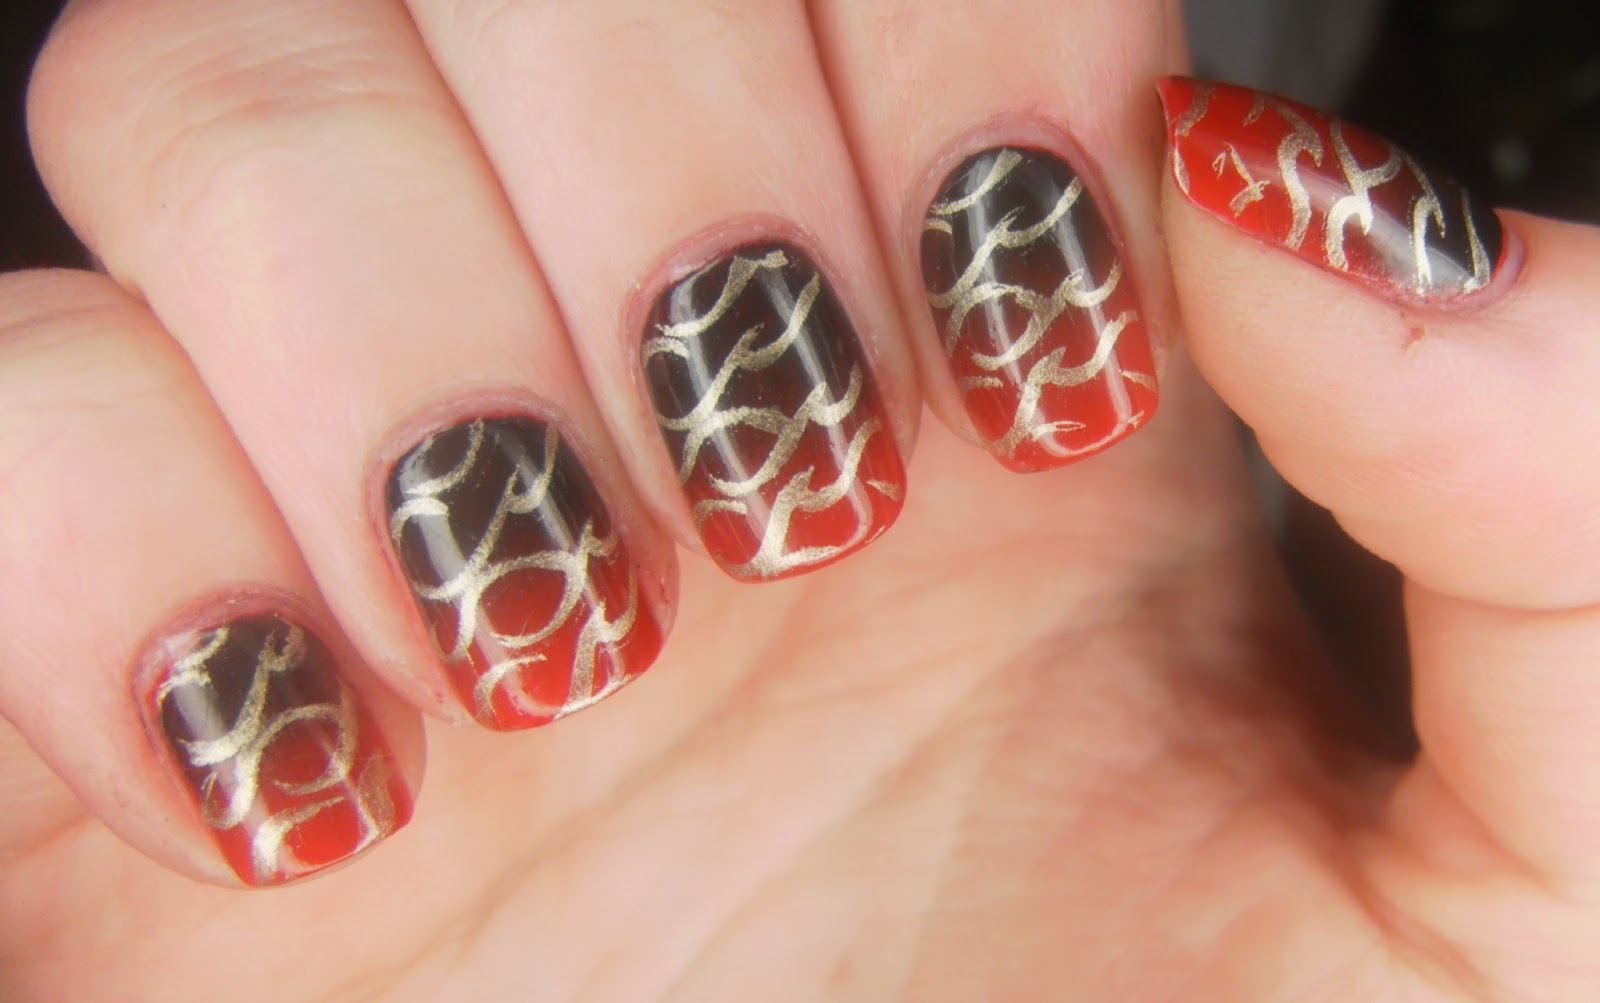
The theme this week is gradients. I LOVE gradients, they took me forever to learn (it's not a difficult technique, but it is tricky to get them just so. I always choose polishes that don't gradient well!), but they are fun, they look amazing when done right, and you don't need special equipment like nail art brushes, or striping tape. OK you need a makeup sponge, but I had those lying around the house and I rarely wear makeup!
As I gradient quite often, I didn't think a plain one would cut it this week. One thing I can't believe I haven't tried is stamping over a gradient. Every time I see someone else do this, I love it, gradients and stamping are two of my favourite techniques, but somehow I've never put them together. Well, I have now!
I must have spent a good couple of hours staring at my nails with this on them. Somehow it all came together - the colours, the gradient, the stamp - and made something very awesome!
I started with a base of OPI The Thrill of Brazil, then did a gradient using that and W7 Black. I needed 2 coats to get the black nice and opaque at the top, but it was worth it! I then stamped with GA3 and Barry M Gold Foil.
I think this has quite a Far Eastern look to it - the colours, and also the stamp weirdly reminds me of dragons? Either way I was really pleased with how this turned out! So much so, I'm wearing a similar manicure today (same colours, different stamp), and I think stamping over gradients is going to be my new obsession!
Remember to have a little look at what everyone else came up with!
Well done to all of us for getting through another week! Today is Double Challenge Friday, later on I'll be showing you my Girly Girl nails, but right now is the extra relaxed 31 day/week challenge, hosted by Rambles of a Polish Addict. We are a third of the way through already!
The theme this week is gradients. I LOVE gradients, they took me forever to learn (it's not a difficult technique, but it is tricky to get them just so. I always choose polishes that don't gradient well!), but they are fun, they look amazing when done right, and you don't need special equipment like nail art brushes, or striping tape. OK you need a makeup sponge, but I had those lying around the house and I rarely wear makeup!
As I gradient quite often, I didn't think a plain one would cut it this week. One thing I can't believe I haven't tried is stamping over a gradient. Every time I see someone else do this, I love it, gradients and stamping are two of my favourite techniques, but somehow I've never put them together. Well, I have now!
I must have spent a good couple of hours staring at my nails with this on them. Somehow it all came together - the colours, the gradient, the stamp - and made something very awesome!
I started with a base of OPI The Thrill of Brazil, then did a gradient using that and W7 Black. I needed 2 coats to get the black nice and opaque at the top, but it was worth it! I then stamped with GA3 and Barry M Gold Foil.
I think this has quite a Far Eastern look to it - the colours, and also the stamp weirdly reminds me of dragons? Either way I was really pleased with how this turned out! So much so, I'm wearing a similar manicure today (same colours, different stamp), and I think stamping over gradients is going to be my new obsession!
Remember to have a little look at what everyone else came up with!
Thursday, 2 May 2013
Sally Hansen Sheer Me Now Jelly Sandwich
Greetings All!
Just a quick post today. This is definitely my favourite way of doing a jelly sandwich - using a sheer neutral. I love the way it transforms the glitter! Plus it's fairly work appropriate and subtle, but it still has glitter in it!
For this sandwich, I started with 2 coats of Sally Hansen Salon Manicure in Sheer Me Now (love the name!). I still had quite a bit of vnl, so I thought, glitter! I added 2 coats of Face It MX311 (again, I can't seem to find a name!). It's your standard multicoloured hex glitter, I probably have several similar to this, but you can never have too much glitter!
I then added another coat of Sheer Me Now.
Ahh, I love it! Brash, sparkly glitter becomes soft, pastel and matte. It's like I've stashed away the glitter so only I know about it lol.
Tomorrow is Double Challenge Friday, so I promise to be more on top of things!
Just a quick post today. This is definitely my favourite way of doing a jelly sandwich - using a sheer neutral. I love the way it transforms the glitter! Plus it's fairly work appropriate and subtle, but it still has glitter in it!
For this sandwich, I started with 2 coats of Sally Hansen Salon Manicure in Sheer Me Now (love the name!). I still had quite a bit of vnl, so I thought, glitter! I added 2 coats of Face It MX311 (again, I can't seem to find a name!). It's your standard multicoloured hex glitter, I probably have several similar to this, but you can never have too much glitter!
I then added another coat of Sheer Me Now.
Ahh, I love it! Brash, sparkly glitter becomes soft, pastel and matte. It's like I've stashed away the glitter so only I know about it lol.
Tomorrow is Double Challenge Friday, so I promise to be more on top of things!
Wednesday, 1 May 2013
Subtle Workwear Stamping
Greetings All!
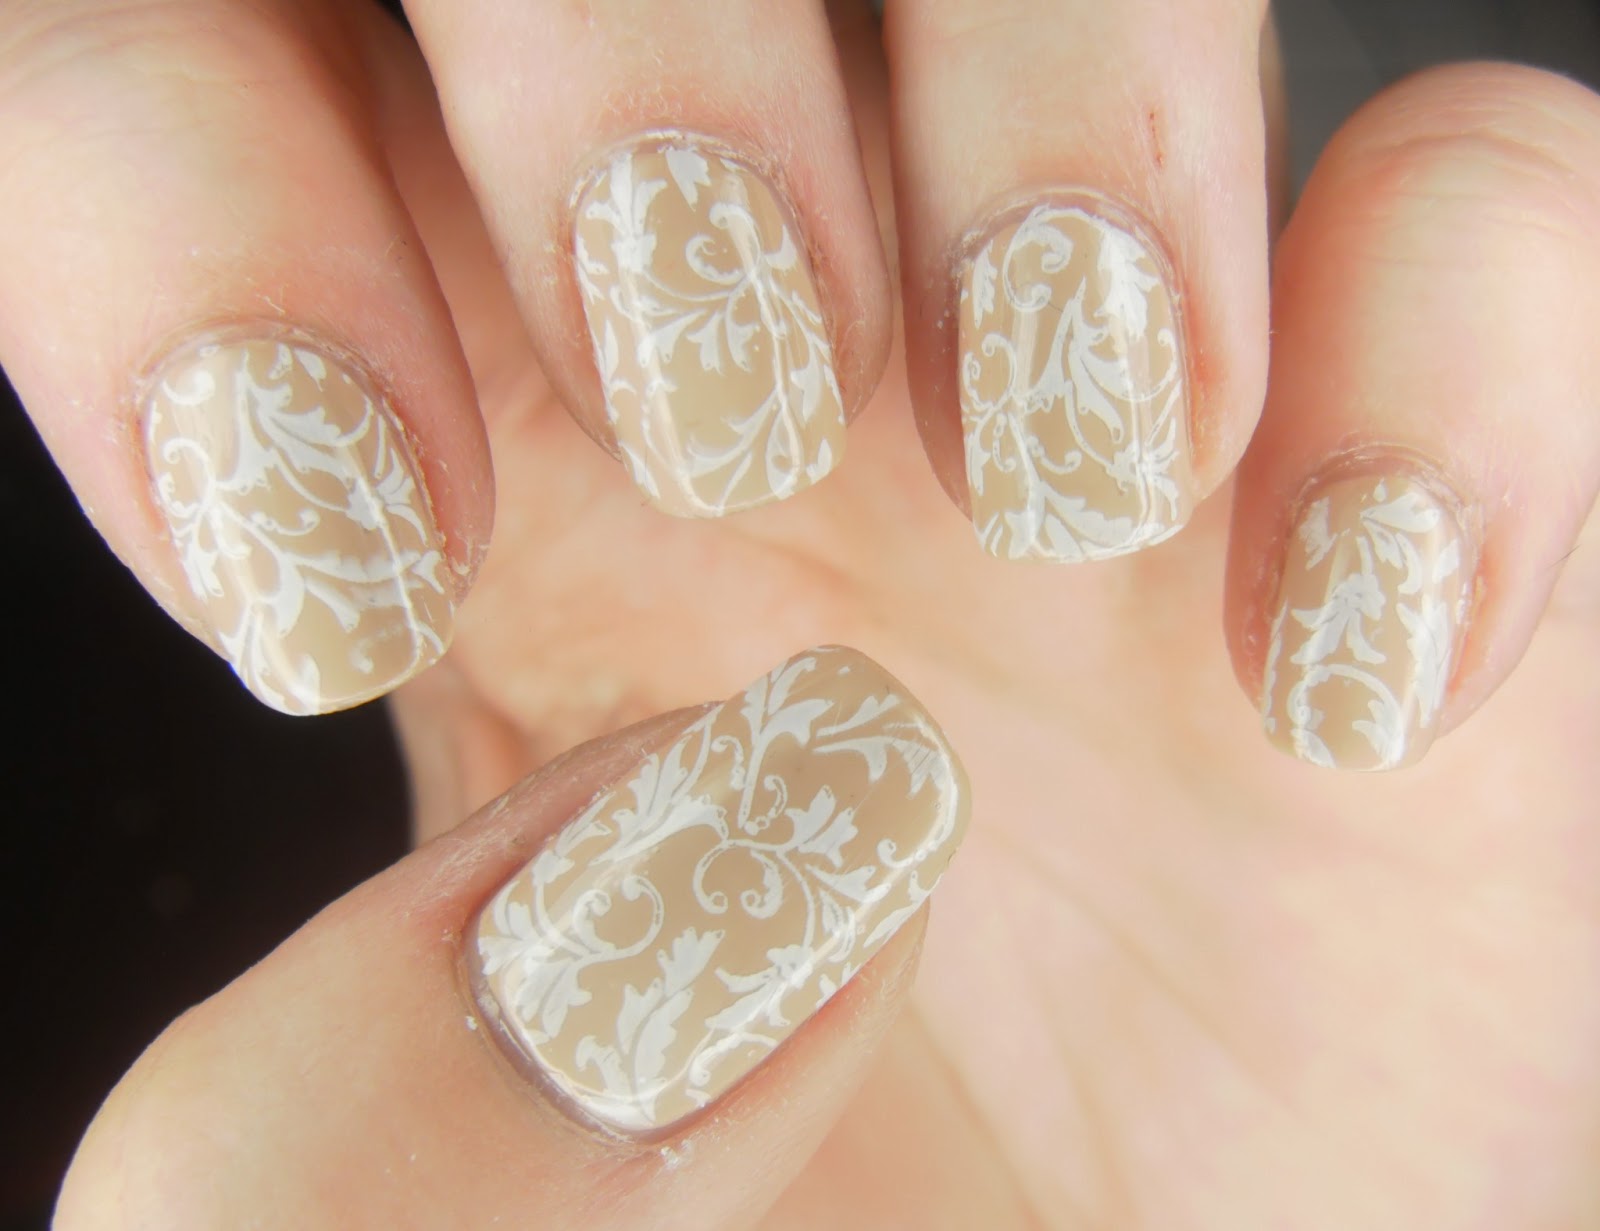
I just wanted to share with you some subtle stamping I wore for work last week. Once upon a time, I used to think that subtle stamping was a bit of a fail - if it doesn't stand out, what is the point? But actually, it can work really well, and it really jazzed up my nails without being too 'obvious'.
My base is 2true shade 11, from Superdrug. This is a really nice nude - my new closest-to-mannequin-hands polish. I stamped with my favourite image from DRK-B, and Konad White. It hasn't stamped quite as crisply as it could have, but I think that adds to the look. It's kind of vintagey and pretty, and I think very work appropriate. This is also after work (hence the even worse than usual cuticles!) and look, no chips! Rare for me, especially from a budget brand!
I really like this white-over-nude look, I've tried tan over nude too - also gorgeous! I don't usually take pictures of my 'work nails' as they're usually quite boring, if not bare! But maybe I'll start.
She Who Does Nail Art Challenges - Holidays
Greetings All!
Happy May Day! It finally looks like Spring is making it's way to Essex. I've been waiting for the sun to wear some of my holo polishes - some of them are the 'sunlight only' kind, so I haven't been 'wasting' them with all this cold and cloud!
As it's a sunny day (well, at this moment it's sunny. It could change any minute though lol), I thought I would share with you my latest nails for She Who Does Nail Art Challenges, hosted by She Who Does Nails. This week the theme is holidays. I haven't been on a 'proper' holiday (i.e. a week in the sun) for 10 years, to be honest I'm quite happy to stay at home and just have time off work! This summer I'll be going to the zoo (because I'm super cool, obviously) and maybe spend a day in Camden (even though it's rubbish now!), but that would make for some pretty obscure nail art! I guess if I did go on holiday, I would like to sit and have delicious fruity cocktails by a pool, somewhere warm and sunny. Much easier to polish!
I have a new, shorter nail length this week! And for the first time ever, it wasn't because of a break. It was more fear of a break! Work has been pretty hectic lately, and I'm pretty sure I would have lost a couple on Monday if I had left them long. Still, they aren't too short, they're all a similar length and shape (similar, not the same lol), stamping will be easier, and they'll grow back!
For this manicure \I used Sally Hansen Himalayan Blue, and Color Club Endless Summer, from the new Fiesta collection. It seemed fitting! ES didn't gradient especially well, but it just gave a bit of depth, like the deep end of a pool? I then stamped with CH36 and Barry M Gold Foil. I'm pretty happy with the result - summery, bright, and reminiscent of holidays!
Please have a little look at everyone else's holiday nails!
Happy May Day! It finally looks like Spring is making it's way to Essex. I've been waiting for the sun to wear some of my holo polishes - some of them are the 'sunlight only' kind, so I haven't been 'wasting' them with all this cold and cloud!
As it's a sunny day (well, at this moment it's sunny. It could change any minute though lol), I thought I would share with you my latest nails for She Who Does Nail Art Challenges, hosted by She Who Does Nails. This week the theme is holidays. I haven't been on a 'proper' holiday (i.e. a week in the sun) for 10 years, to be honest I'm quite happy to stay at home and just have time off work! This summer I'll be going to the zoo (because I'm super cool, obviously) and maybe spend a day in Camden (even though it's rubbish now!), but that would make for some pretty obscure nail art! I guess if I did go on holiday, I would like to sit and have delicious fruity cocktails by a pool, somewhere warm and sunny. Much easier to polish!
I have a new, shorter nail length this week! And for the first time ever, it wasn't because of a break. It was more fear of a break! Work has been pretty hectic lately, and I'm pretty sure I would have lost a couple on Monday if I had left them long. Still, they aren't too short, they're all a similar length and shape (similar, not the same lol), stamping will be easier, and they'll grow back!
For this manicure \I used Sally Hansen Himalayan Blue, and Color Club Endless Summer, from the new Fiesta collection. It seemed fitting! ES didn't gradient especially well, but it just gave a bit of depth, like the deep end of a pool? I then stamped with CH36 and Barry M Gold Foil. I'm pretty happy with the result - summery, bright, and reminiscent of holidays!
Please have a little look at everyone else's holiday nails!
Subscribe to:
Posts (Atom)